What is bean-to-bar chocolate?
In the realm of culinary adventures, few experiences are as rewarding and satisfying as making your own chocolate from scratch. From the earthy aroma of raw cacao beans to the smooth, velvety texture of the finished bar, the journey of creating homemade chocolate is truly magical. Today, we embark on a journey into the world of bean-to-bar chocolate making, exploring the artistry, science, and sheer joy of crafting your own delectable treats right in the comfort of your home.
At its core, bean-to-bar chocolate making involves transforming raw cacao beans into delectable chocolate bars, bypassing the mass production processes typical of commercial chocolate manufacturing. This hands-on approach allows for greater control over ingredients, flavours, and textures, resulting in chocolates that are truly unique and tailored to individual preferences.
Each batch of chocolate is a labour of love, with attention to detail in roasting, grinding, and tempering, resulting in distinctive flavours and textures that reflect the unique characteristics of the cacao beans used. Beyond simply creating chocolate, bean-to-bar makers strive to showcase the intricate journey from bean to delectable bar, inviting consumers to appreciate the richness of the process as much as the flavour of the chocolate itself.

Sourcing Quality Cacao Beans:
The foundation of exceptional chocolate lies in the quality of the cacao beans. Start your bean-to-bar journey by sourcing high-quality beans from reputable suppliers or speciality stores. Look for beans that are ethically sourced, preferably from single-origin farms, as they offer distinct flavour profiles reflective of their terroir.

View All Artisan Chocolate Link to range
How to Roast Cacao Beans:
Roasting cacao beans at home can be a delightful and rewarding process, yielding rich, aromatic flavours that elevate any chocolate-making endeavour. To begin, preheat your oven to around 250°F (120°C). Start by sorting through your cacao beans, discarding any damaged or discoloured ones. Spread the beans evenly on a baking tray lined with parchment paper, ensuring they are in a single layer to facilitate even roasting.
Place the tray in the preheated oven and roast the beans for approximately 20 to 30 minutes, depending on your desired roast level. Remember to rotate the tray occasionally to prevent uneven roasting. Keep a keen eye on the beans, as they will emit a delightful aroma and undergo subtle colour changes, indicating their readiness.
Cracking & Winnowing Cocoa
Once roasted, let them cool slightly before moving on to the cracking stage. Use a sturdy kitchen tool like a rolling pin or a heavy-duty mortar and pestle to crack the beans, breaking them into smaller pieces while ensuring not to crush them completely. Next, winnow the cracked beans to remove the outer husks. This can be done by gently blowing on the cracked beans outdoors or by using a hairdryer on a low, cool setting indoors. The lighter husks will blow away, leaving behind the heavier cacao nibs. Repeat this process until most of the husks are removed, and you’re left with clean cacao nibs ready to be used in your favourite chocolate recipes.
Grinding & Conching Cacao
Grinding and conching cacao beans requires precision and patience to achieve the desired results. Begin by selecting high-quality cacao beans, ensuring they are free from any debris or impurities. Roast the beans in an oven or a hot pan until they develop a rich aroma, then allow them to cool before proceeding. Next, crack the beans and remove the shells to reveal the nibs inside. Grind the nibs using a mortar and pestle, food processor, or specialised grinder until they form a smooth, liquid-like consistency known as chocolate liquor. This process may take some time and requires periodic scraping down of the sides to ensure even grinding. Once the liquor is smooth, transfer it to a conching vessel or a bowl and continue to grind, adding any desired sweeteners or flavourings gradually. Conching involves mixing and aerating the chocolate to improve its texture and flavour. This can be done manually by stirring the mixture continuously or using a conching machine if available. After several hours or days of conching, depending on personal preference and equipment used, the chocolate will develop a smooth, velvety texture and complex flavour profile. Finally, pour the chocolate into moulds or containers and allow it to set before indulging in homemade, artisanal chocolate delights.
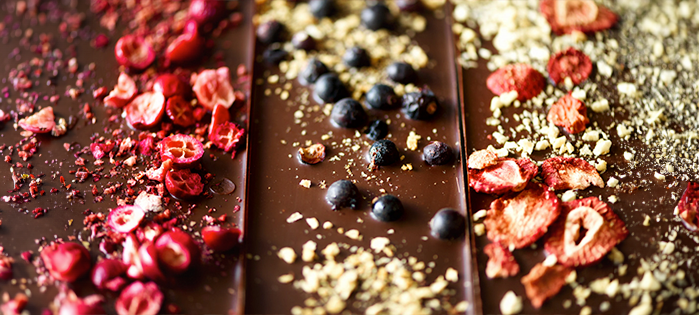
How to add Sweeteners & Flavourings to Cacao:
When crafting homemade chocolate, enhancing its flavour with natural sweeteners and flavourings can elevate its taste to a whole new level. To start, one can opt for natural sweeteners such as honey, maple syrup, or agave nectar, which not only add sweetness but also impart unique flavour notes. Incorporating these sweeteners requires careful adjustment to maintain the chocolate’s texture and consistency. Additionally, infusing the chocolate with natural flavourings like vanilla extract, peppermint oil, or almond essence can introduce delightful nuances to the palate. These flavourings should be added sparingly to avoid overpowering the chocolate’s inherent richness. Experimentation with different combinations and proportions of sweeteners and flavourings allows for the creation of personalised, indulgent treats that tantalise the taste buds with every bite.


Tempering & Molding Cacao:
Tempering is a crucial step in chocolate making that ensures the final product has a glossy finish and a satisfying snap. This process involves carefully heating and cooling the chocolate while agitating it to encourage the formation of stable cocoa butter crystals. Once tempered, the chocolate is poured into moulds and allowed to set before being unmolded into beautiful, shiny bars ready for indulgence.
Mixed Cases Link to range
How to Store Chocolate & Keep It Fresh:
To maintain the freshness of homemade chocolate, proper storage is crucial. Firstly, ensure that the chocolate is completely cooled and solidified before attempting to store it. Opt for an airtight container to shield the chocolate from moisture and odours, which can compromise its quality. Additionally, store the chocolate in a cool, dry place away from direct sunlight and heat sources, as excessive heat can cause the chocolate to melt or develop a grainy texture. Be cautious of storing chocolate in the refrigerator, as chocolate stored in the refrigerator can “sweat” meaning that a layer of moisture will form on the surface of the chocolate. When stored correctly, homemade chocolate can maintain its freshness and flavour for an extended period, allowing you to savour its delectable taste for days to come.
In a world inundated with mass-produced confections, there’s something truly special about crafting your own chocolate from scratch. Whether you’re a seasoned chocolatier or a curious novice, bean-to-bar chocolate making offers a delightful opportunity to connect with the origins of one of humanity’s most beloved treats. So roll up your sleeves, gather your ingredients, and prepare to embark on a deliciously decadent adventure in chocolate making. After all, there’s no sweeter satisfaction than enjoying a homemade chocolate bar that you’ve lovingly crafted with your own two hands.
Discover More

5 Bank Holiday Cocktails To Lift Your Spirits
Wondering how to maximise your leisure time during April bank holidays in 2024? Whether you crave adventure with Aperitivo, tranquility with Tequila, or cultural immersion with Coconut Rum, this guide has all your needs covered.
Keep reading
Can You Freeze Cheese? Yes Here’s How
When it comes to freezing cheese, not all types are created equal. Some cheeses freeze well, while others may become crumbly or lose their original characteristics. Here’s a breakdown of the types of cheeses that you should & shouldn’t freeze.
Keep reading
Kitchen Hacks: Money-Saving Tricks for Busy Cooks
If you’ve ever found yourself staring down a recipe, wondering if you have enough time, energy, or sanity to tackle it, fear not! Grab your spatulas, sharpen your knives and let’s dive into the world of culinary creativity!
Keep reading
Meet the Makers: Rythmik Cocktails
Rythmik Cocktails was an idea born in lockdown at the award-winning bar we owned, renowned for serving up expertly mixed cocktails and music to those in the know.
Keep reading
10 Surprising Uses for Olive Oil Beyond the Kitchen
Surprising uses for olive oil extend far beyond its traditional role in the kitchen. This versatile oil serves as a natural remedy and solution for a variety of everyday needs.
Keep reading
Meet the Makers: World Of Zing
What sets World of Zing apart is its dedication to innovation and experimentation. Elevate your libations with exotic flavours like Persian Lime & Nori Tequila, or indulge in the smoky notes of their Smoked Hibiscus Margarita.
Keep readingLoading…
Something went wrong. Please refresh the page and/or try again.
